Affiliate links on Android Authority may earn us a commission.Learn more.
Add fingerprint authentication to your app, using BiometricPrompt
August 14, 2025
We’re all storing more information on our mobile devices than ever before, and many of us regularly use smartphones and tablets to perform sensitive operations, such as making in-app payments. When you consider all the tasks you perform on your mobile device, and the information it has access to, it’s easy to understand why security is ahugeconcern for many Android app developers.
To help keep your users safe, you might want to consider locking parts of your application, or even yourentireapplication, using a PIN, password, token generator, security key, orbiometric authentication, where the user confirms their identity using a unique body feature, such as a fingerprint.
Biometric authentication is becoming increasingly popular, as pressing your fingertip to a touch sensor is easier than typing a password, more convenient that carrying a security key, and biometrics such as fingerprints cannot be easily stolen or guessed, compared to other authentication information such as passwords.
In this article, I’ll show you how to add single-touch identification to your app, using Android Pie’s new BiometricPrompt API. Once you’ve mastered this API, you can use it to lock sensitive areas of your application, such as its “Complete Purchase” screen, secure personal user information, or you could even use BiometricPrompt to lock yourentireapplication.

Why should I care about fingerprint authentication?
The new BiometricPrompt API makes it easier to integrate biometric authentication into your app, but addinganynew feature requires time and effort.
To help you decide whether biometric authentication makes sense for your particular application, let’s look at the major benefits of opting for fingerprint authentication, compared to other authentication methods.

It’s more user-friendly
Knowledge-based identification methods such as PINs, passwords and patterns may add an extra layer of security to your app, but they also add friction to the user experience.
The smaller, virtual keyboard available to your typical smartphone or tablet makes typing a more time-consuming and frustrating experience. Even if the user tries to make their life easier by opting for a short and simple (and insecure!) password, such as 1234, and your app only requests this password once per session, it willstilladd friction to the user experience.
By comparison, pressing a fingertip to the device’s touch sensor is quick, easy and friction-free. Once the user has got into the habit of authenticating with their fingerprint, they should be able to unlock your app without even really having to think about it.
You can’t forget a fingerprint
When it comes to creating a strong, secure password, we’re all familiar with the advice: use a unique password for every app, website and account, and make sure each of these passwords is long, complex and includes a mix of different numbers, letters and symbols.
By following these guidelines, you can reduce the chances of a hacker guessing your password, but you also increase your chances of forgetting that password.
Let’s assume all of your users follow best practices, and have a list of long, complex passwords that they’re already struggling to remember. If your app adds to this list, then you run the risk of them forgetting their password and winding up locked out of your application as a result.
By opting for fingerprint authentication, you can offer all the protection of a password with zero risk of a forgetful user losing access to your app. After all, even if a user is particularly absent-minded and is forever forgetting their passwords, PINs and patterns, it’simpossiblefor them to forget their fingerprint!
No-one can guess a fingerprint
Even if the user follows all the guidelines for creating strong, secure passwords, there’s still a chance that someone might be able to steal, or even guess the user’s password.
Perhaps a sneaky friend or family member peeks over their shoulder while they’re entering their PIN, or maybe they accidentally download a malicious app that leaks all of their passwords. It may even be possible for someone to guess the user’s password,especiallyif they’re using a password that regularly appears in those Top 10 Most Common Passwords articles.
While no authentication method is ever 100% bulletproof, even the most talented hacker cannot guess or steal biometric information, using the same tricks they use to acquire passwords, PINs and patterns.
FingerprintManager or BiometricPrompt: What’s the difference?
Since the release of Android Marshmallow, developers have been able to add fingerprint authentication to their apps usingFingerprintManager, which was Android’s first official biometric API.
Now, with the release of Android Pie, Google are deprecating FingerprintManager in favour of a newBiometricPrompt API.
Despite the similarities between these two APIs, BiometricPrompt differs from FingerprintManager in a few key areas:
1. A consistent user interface
The FingerprintManager API doesn’t include a standardized authentication dialog. When it comes to requesting fingerprint authentication, Google provides someguidelinesand have even published asample app, but the developer is ultimately responsible for designing and implementing their own fingerprint authentication dialog.
From the user’s perspective, this has resulted in an inconsistent and potentially confusing experience, where every application has the potential to handle fingerprint authentication in a slightly different way. From the developer’s perspective, the process of designing, building and managing a custom authentication dialog requires time and effort that could be better spent elsewhere.
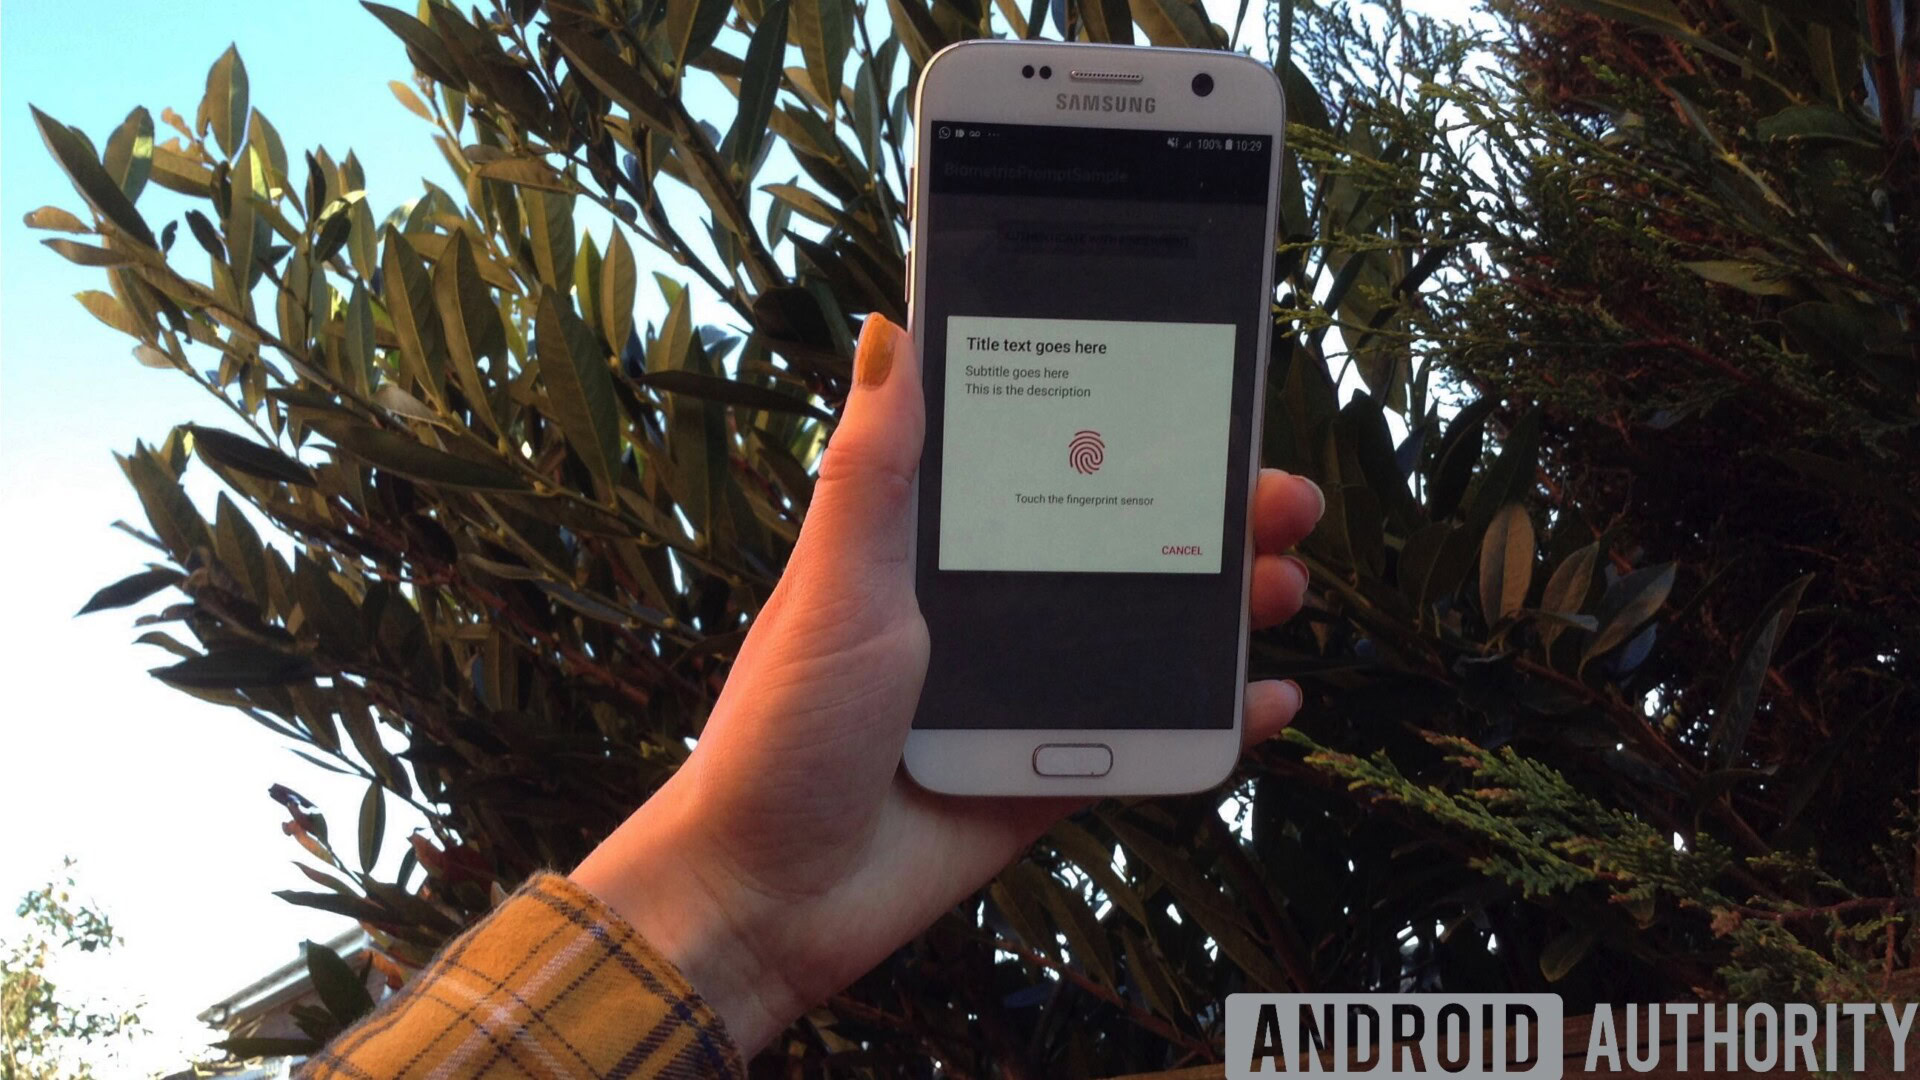
Unlike FingerprintManager, the BiometricPrompt API provides a standardized dialog that you can use to request a fingerprint scan, and display the results to the user.
By using this standard dialog, you’re able to provide exactly the same fingerprint authentication experience as every other application that uses the BiometricPrompt API. This consistency means that even someone who’s launching your app for the very first time should be able to successfully navigate your application’s fingerprint authentication, as they’ll have encountered this exact same dialog countless times before.
2. Easier implementation
BiometricPrompt performs much of the authentication logic that you previously had to implement and manage manually.
Just specify the text that should be included in your authentication dialog and implement a few callbacks, and BiometricPrompt will manage the rest automatically, including handling excessive failed authentication attempts.
3. Lower spoof and imposter rates
The BiometricPrompt API encourages developers to use secure biometric authentication, by only exposing authentication methods that Google deem to be “strong.”
All of these Google-approved biometric methods are tested in the following areas:
BiometricPrompt only exposes biometric methods that have a SARandIAR score of 7% or less, helping your app deliver a consistent level of security.
4. More than just fingerprint authentication
Biometric authentication isn’t just limited to fingerprints. In theory, with the right scanners and algorithms, you’re able to confirm your identity using any bodily feature that’s unique to you.
Instead of focusing solely on fingerprint authentication, the BiometricPrompt API takes a more biometric agnostic approach. When you use the BiometricPrompt API, Android takes stock of the biometric authentication methods that are available on the current device and then selects the most appropriate method, which may not necessarily be fingerprint authentication.
At the time of writing, the BiometricPrompt API supported fingerprint scanners, iris scanners, and facial recognition. As biometric technologies continue to evolve and new forms of authentication make their way onto Android devices, this biometric agonistic API is positioned to help developers leverage additional authentication methods.
To help keep things simple we’ll be focusing on fingerprint authentication throughout this article, but just be aware that the BiometricPrompt API isn’t restricted to fingerprints.
Using BiometricPrompt in your Android apps
Let’s use the BiometricPrompt API to create an app that will allow the user to confirm their identity using a fingerprint.
Open Android Studio and create a new project, using the “Empty Activity” template. When prompted, set your project’s minimum SDK to 28 or higher, as this will prevent your application from being installed on anything earlier than Android Pie.
If you wanted to make your app accessible to a wider range of Android devices, then you’d need to check what version of Android your application is currently installed on, and then handle biometric authentication differently, depending on the device’s API level.
Add the Biometric library
To start, open your module-level build.gradle file, and add the latest version of the Biometric library as a project dependency:
Add the USE_BIOMETRIC permission
The BiometricPrompt API lets you tap into all the different biometric authentication methods that the device supports, via a single permission.
Open your project’s Manifest, and add the “USE_BIOMETRIC” permission:
Create your application’s layout
Next, let’s create our application’s layout. I’m going to add a single button that, when tapped, will launch the fingerprint authentication dialog:
Open your project’s strings.xml file, and add the “auth” string resource:
Authenticating the user’s identity
Now, let’s look at how you’d authenticate the user’s identity, using BiometricPrompt.
Create a biometric prompt instance
The BiometricPrompt class includes a companion Builder() class, which you can use to create a BiometricPrompt instance and initiate the authentication:
When building your BiometricPrompt instance, you’ll need to define the text that should appear in the authentication dialog, and customize the “negative button,” which is the button that allows the user to cancel the authentication.
To configure the authentication dialog, you’ll need to provide the following:
At the time of writing, it wasn’t possible to customize the icon or the error message that’s used in the authentication dialog.
Finally, you’ll need to call build(). This gives us the following:
Handle the authentication callbacks
The BiometricPrompt instance is assigned a set of authentication callback methods that’ll notify your app about the results of the authentication process.
You’ll need to wrap all of these callbacks in a BiometricPrompt.AuthenticationCallback class instance:
The next step is implementing some, or all of the following callback methods:
1. onAuthenticationSucceeded()
This method is called when the fingerprint is successfully matched to one of the fingerprints registered on the device. In this scenario an AuthenticationResult object is passed to the onAuthenticationSucceeded callback and your app will then perform a task in response to this successful authentication.
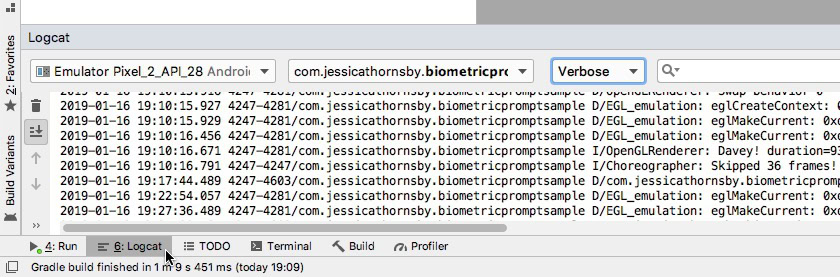
To help keep things simple, our app will respond by printing a message to Android Studio’s Logcat:
2. onAuthenticationFailed()
This method is triggered when the scan is completed successfully but the fingerprint doesn’t match any of the prints registered on the device. Again, our app will respond to this authentication event, by printing a message to Logcat:
3. onAuthenticationError
This callback is triggered whenever an unrecoverable error occurs and the authentication cannot be completed successfully. For example, perhaps the device’s touch sensor is covered by dirt or grease, the user hasn’t registered any fingerprints on this device, or there isn’t enough memory available to perform a full biometric scan.
Here’s the code I’ll be using in my app:
4. onAuthenticationHelp
The onAuthenticationHelp method is called whenever a non-fatal error occurs, and includes a help code and a message that provide further information about the error.
To help keep our code straightforward, I won’t be using onAuthenticationHelp in our app, but an implementation would look something like this:
Finally, we need to call the authenticate() method of the BiometricPrompt instance:
Implementing Android Pie’s biometric authentication
Once you’ve completed all the above steps, your MainActivity should look something like this:
Testing your project
Now you’ve created your project, it’s time to put it to the test and see if it actually adds fingerprint authentication to your app !
To run this project, you’ll need either a physical smartphone or tablet that’s running Android Pie, or an Android Virtual Device (AVD) that’s using the Android P preview or higher.
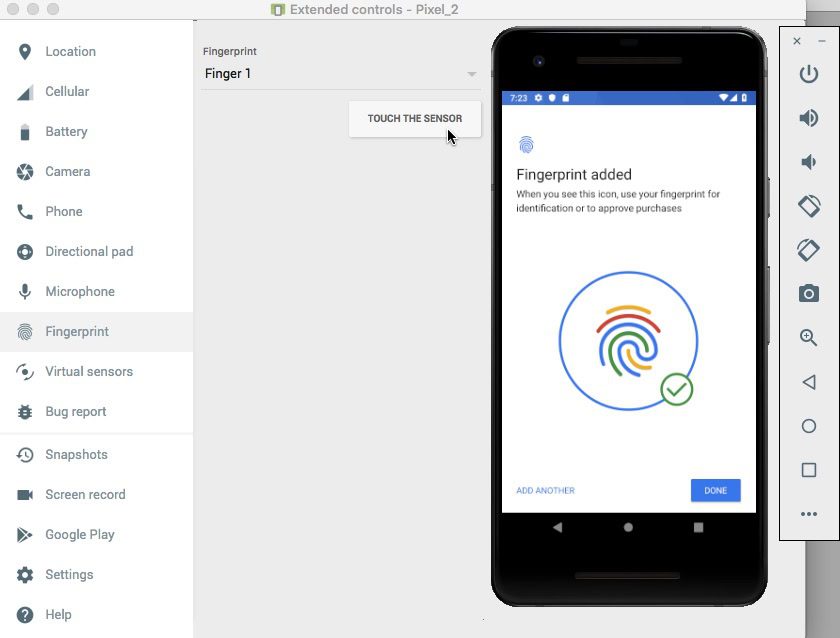
You’ll also have to register at least one fingerprint on your device. If you’re using a physical Android device, then:
Android virtual devices don’t have a physical touch sensor, so you’ll need to simulate a touch event:
Once you’ve registered at least one fingerprint, you’re ready to put your application to the test. I’m going to test how our application handles three different scenarios:
Let’s attempt to authenticate using the fingerprint we just registered on our device:
Next, let’s see what happens if we attempt to authenticate using a fingerprint that isn’t registered on this device:
As already mentioned, the BiometricPrompt API automatically handles excessive failed authentication attempts. To test this functionality:
You candownload the complete application from GitHub.
Wrapping up
In this article, we explored Android Pie’s new BiometricPrompt API, which lets you easily add fingerprint authentication to your app. Do you think BiometricPrompt is an improvement on Android’s previous fingerprint authentication methods? Let us know in the comments below!
Thank you for being part of our community. Read ourComment Policybefore posting.
