Affiliate links on Android Authority may earn us a commission.Learn more.
Android customization - Device security, intrusion detection using Tasker
August 02, 2025
Last week in ourAndroid customizationseries, we looked atclearing device cacheand wiping out the somewhat overloaded photo thumbnail cache on your Android device. These actions will be valuable if you follow along today.
Today we are looking at creating custom device security usingTasker, the idea is simple, we’ll show you how to make your device take a photo of any person accessing your phone. As a bonus, we’ll verify the device location is saved in the name of the image file.

Before we get started
Let me explain again what we are up to, we are looking at security here today. We want to capture an image of anyone that turns on the display of your device. Then we save the current GPS coordinates, as well as the date and time, as a part of the image file name.
Let’s do this.Open up Taskerand head to theTasks tab. We will start by creating a variable that includes the device location, then we’ll take the photo.
Create a new Task, name it concisely and uniquely, I’ll call mine “SecurityPic“.
Tap the “+” button to add a new Action.
SelectVariables.
SelectVariable Set.
In theNamefield, create a local variable to the GPS coordinates. I entered “%securegps“.
In theTofield, tap the label icon and look for Location, or just enter “%LOC“.
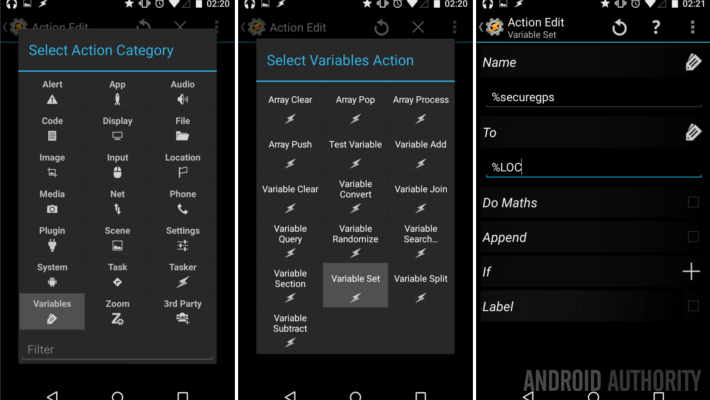
Tap the systemBackbutton to save and exit.
Truth is, only storing the GPS location in the variable is a bit of a waste. I used a variable here so that you can easily include more information in your save file. Tasker will cover the date and time, but you may add battery level, keylock status, and so much more.

Tap the “+” button to add your next Action.
SelectMedia.
SelectTake Photo.
UnderCamera, chooseFront.
UnderFilename, tap thelabels iconand chooseyour location variable. Or just enter it manually, mine was “%securegps“.
UnderNaming Sequence, chooseChronological. This is where it adds the date and time.

De-selectthe check box to turn offInsert In Gallery.
Selectthe check box to turn onDiscreet. This makes it so that the photo app does not display on the screen, taking the photo in the background.
Feel free to change the Resolution if you desire.
If you see the option called Flash Mode, I suggest turning it off.
Hit the systemBackbutton to save and exit, then hit it again to exit out of the Task.
Now that we have our Task in place, we need to decide how and when to use it. That is a simple decision based on the goal of our project today. So,head on over to the Profiles tabso we can set the trigger for our picture taking Task.
Tap the “+” to add a new Profile.
Name it uniquely and concisely, I called mine “SecurityCam“.
SelectEvent.
SelectDisplay.
SelectDisplay On. (You could select Display Unlocked, if you suspect your device is being accessed by someone who knows your unlock code/pin/pattern.)
Tap the systembackbutton to save and exit.
From the list of available Tasks,choose your security cam Task, mine was called “SecurityPic“.
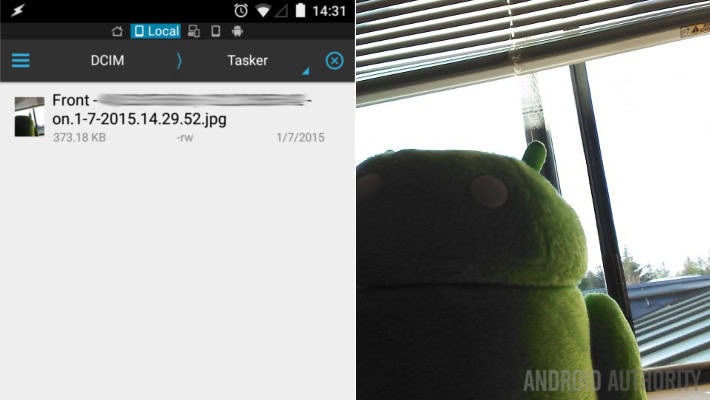
That is all there is too it. From here on out whenever your device is turned on (or unlocked) your device will take a quick snapshot of the user accessing it.These photos will be saved in the DCIM/Tasker folder. So be sure to head in there frequently toclean out, if needed.
What’s next
This is obviously not a great Tasker Profile to have running full time, unless you like to see hundreds of awkward photos of yourself, so we should look atcreating a trigger to turn on the Profile when needed.
For these purposes, I would like to use a SMS trigger. This really should be a tutorial all its own, but let’s do it.
Create a new Task, name it something like “StartSecurityCam“. Create your task, hit the “+” button, chooseTasker->Profile Status, tap thelabel iconbeside Name and choose yourSecurityCamProfile. SetSettoOn. You’re finished here.
Create your Profile, name it as needed. SelectEvent->Phone->Received Text. Although you can mess with the details here, I would recommend simply entering asecret code into the Content field. Keep in mind that if your phone is lost and in the hands of an intruder, they will see this message, so enter something truly unique and inconspicuous. I have entered “Is this HAL?”
Hit the systemBackbutton to exit out, thenchooseyour “StartSecurityCam” Task from the previous step.
What you do now is turn off the SecurityCam Profile. When your device is lost, stolen or you suspect someone is tapping into it behind your back, find a service or another phone to send yourself a text. Be sure to enter the exact phrase entered above. When your phone receives the SMS, the SecurityCam Profile turns on and pictures begin snapping away of the person touching your phone.
You could also look at having your device automatically send a discreet return SMS that includes the GPS coordinates of your phone, to help find it if it is not where it should be. While it is not as easy to send the captured images of your culprit, if you make sure the folder auto-uploads images to a service like Google+ or Dropbox, you will have the date, time, GPS coordinates and a picture to take to law enforcement, or otherwise recover your phone.
Did we go overboard today with creating a security cam in ourAndroid customizationseries? I hope not, and I hope that this project saves you some grief over a missing or compromised Android device. Next week, we would like to continue with the idea of recovering a lost phone – besides thelock screen contact info tutorialwe had a while back, Google themselves have a tool for you, calledAndroid Device Manager. We’ll be walking through how to set up Android Device Manager on your device, and how to use it from the web.
Do you use any similar type of security measures for your Android devices?
Thank you for being part of our community. Read ourComment Policybefore posting.
