Affiliate links on Android Authority may earn us a commission.Learn more.
Build real-time battery drain warnings using Tasker - Android customization
August 10, 2025
Last week on ourAndroid customizationseries we took a somewhat confusing and in-depth look at storing battery data at various points throughout the day. While that was a greattool for capturing long term battery statistics, we are going for something a little more immediate this week, usingTaskerto build warnings to notify us when our battery is draining too quickly.
The idea is simple, seeing long term battery stats is great, but we really want a real-time warning system, something that pops up and says “hey, your battery is draining too fast!”

Before we get started
Real-time battery drain warnings using Tasker
Let’s walk through the approach to this project with a bit more detail. Unless you have a brand new device, I am sure you have an idea of just how long your battery typically lasts on your Android phone or tablet. You might be used to an average of about 3-4 hours of screen-on time for a phone, 4-5 hours for a tablet, but no matter what it is, you’ll need to take note of that number before anything else.
The project is actually really simple, as an overview, if you expect your battery to last a minimum of 5 hours, but it is draining at a rate that would kill it in, say, 4 hours, we simply throw up a warning, alarm, notification or something of that sort. There are a few ways this can be done, for today, we’ll do it by tracking the amount of time in between each 1% drain in your battery.

Some math to get started
As mentioned, you need to have an idea of what amount of time your battery should last, for this, go with the amount of time it will last with the display turned on. I’ll build my project based on 3 hours of screen-on time.
What we need to proceed is to figure out how many seconds each 1% of your battery should last. Luckily, there are 100 percentage points in everyone’s battery, so the math is more about converting time than anything. Our math goes as follows, 3 hours is 180 minutes, which is 10,800 seconds. Divide that by my 100 percentage points and we get that each 1% of my battery should last at least 108 seconds.

Is that easy enough to understand? All we will be doing is watching the time between battery level changes, if it drops 1% in less than 108 seconds, the battery is draining too fast for our liking. And if it lasts for more than 108 seconds, all is well. No warnings required.
Let me give you a few numbers, save you some work: 3 hours screen-on is worth 108 seconds. 2.5 hours is worth 90 seconds. 3.5 hours is worth 126 seconds. 4 hours is worth 144 seconds. 4.5 hours is worth 162 seconds. And 5 hours is worth 180 seconds. Any other values and you’ll have to do the math for yourself, sorry.
The project
Once you dive intoTasker, the specifics of your project, in order, will be to build a Task that collects the current time, compares it to a Variable containing a previously saved time, if the difference is too short, it throws up an Alert, and then it re-writes the placeholder time Variable for use the next time this Task runs. With the Task complete, you then build a Profile that runs every time the battery level changes. Nice and easy.
Time comparison Task
We start off by building our Task, which will be the major piece of this project. As always, this could be built out into a few different re-usable Tasks, but we’ll do it all at once for today.
Head to theTask sectionand hit the “+” buttonto begin a new Task. Name it appropriately, I’ll call mine “BatteryDrainWarning“.

Now, we must start at the end, with our Variable, to prevent errors when we start doing the heavy lifting.
Tap the “+” buttonto start the action.
ChooseVariables.
ChooseVariable Set.
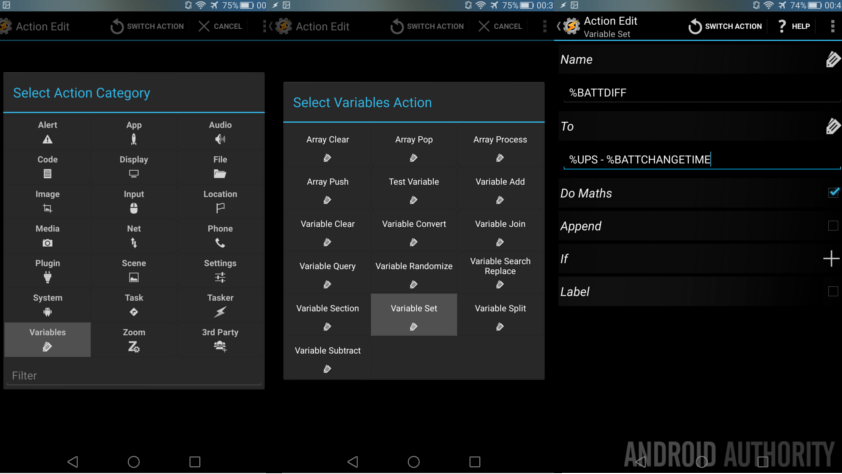
Provide a name for your new variable. Remember that you need to start with the % symbol and we want this variable to go global, so use all capital letters. I’ll call mine “%BATTCHANGETIME“.
Now, in theTosection, tap the littlelabel iconto search the built-in variables, chooseUptime Seconds. Or, you can just type “%UPS” onto the To line.
Tap the systemBackbutton to save and exit out of the action.
Now, this is important, you need torun this Task before we continue. Justtap that triangle play icon in the bottom left, watch for the green dot beside the Variable action to confirm completion.
Now we can proceed to the big actions. Tap that “+” buttonto start your next action.
Once again,select Variablesandthen Variable Set.
Name your next variablesomething like “%BATTDIFF“.
Then, in theTo section, enter a mathematical equation to calculate the time in between battery changes, since we are using UpTime, we simply subtract our saved UpTime in the previous Variable from the current UpTime. Or, justenter the following:
%UPS – %BATTCHANGETIME
Now,turn onthe check box besideDo Maths.
Hit that systemBackbutton and let’s take some action.
Tap the “+” buttonto add your next action.
ChooseTask.
In theCondition fields, firstenter your battery difference variable, mine was “%BATTDIFF“.
Tap the“~”button to change the comparison toMaths: Less Than, which will enter the “<” symbol.
Then enter into theValuefield yournumber of seconds you want your device to lastbetween battery drain, if you recall from earlier, mine is108.
Tap the systemBackbutton to get back to the actions list.
With that IF in place, we are saying simply, if the difference in time between now and the last time our battery changed levels is less than 108 seconds, let’s do something. What shall we do? Let’s keep this simple, I’d like for now to just flash a message on the screen.
Tap the “+” button.
ChooseAlert.
ChooseFlash.
In theText field,write yourself a message, remember to include the variables to add extra value. You might put something like:
“Battery discharged 1% in the last %BATTDIFF seconds. Now at %BATT% and dropping fast.”Or you might just put “Battery drain warning” if you don’t want to see the details on the screen.
Tap the systemBackbutton to get back tot he actions list.
Now, as all good programmers will tell you, we must close the IF statement with an END IF.
Tap that “+” button.
SelectTask.
SelectEnd If. Nice and easy.
Now,before you do anything else, we have to clean up that first action we created, remember that it is supposed to be the last things we do here, not the first.
Long press on the right hand edge of the action, thendrag to the bottom.
There we go, we now have a Task that looks at the time your battery last changed, figures out how long ago that was, then if, and only if, that amount of time is too short for our liking, we throw a warning message onto the screen. Then, at the end, we re-set the variable that remembers the last time the battery level changed, all ready to go for next time.
Remember to hit that systemBackbutton to exit out of the Task creation. What we need now is to create the Profile that makes this all take action.
Profile to run the battery warning Task
Now that you have the Task filled out with calculations and actions all completed, let’s create the Profile that triggers it.
Head over to Profilesand hit that “+” button to get started. Provide a name, if asked, I called mine “BatteryDischarge“.
ChooseEvent.
ChoosePower.
ChooseBattery Changed.
Change priority if you so desire, otherwise just hit the systemBackbutton to continue.
Now choose your “BatteryDrainWarning” Task.
One last thing before we call this complete, I am sure you do not want to see the warning pop up when you are charging the device. Right now it will, so let’sadd a condition so that the Task only fires off when your device is not plugged in.
Long presson the wordsBattery Changed.
ChooseAdd.
ChooseState.
ChoosePower. (Again.)
Leave it onAnyandturn onthe check mark besideInvert.
Hit that systemBackbutton to see your new completed Profile.
Sit back and enjoy. Or, I suppose this is not something to enjoy, being that when you see this project in action, your battery is dying quickly. But hey, you know what I mean.
Remember that you can go back to that IF statement and change up your time to get different results. If you increase the number, you will see more warnings, if you decrease the number, you will see fewer warnings. If you just want to test to ensure this thing is working, temporarily change that 108 to like 10800, then you are sure to see the message every time the battery level drops.
What’s next
I found that my warning message was too long, most times I wasn’t able to read it all before it disappeared from the screen. That said, I didn’t want to remove any of the information, so I needed to do something, and making it appear on screen longer was not desirable. What do you know, we created a project just last week thattakes information like this and writes it to a text file. Now I have a BatteryWarningsLog.txt file saved on my device that I can jump back to if I miss the actual warnings.
We worked off of a single battery life expectancy for the project today, but we all know that battery life is different when the display is turned on vs when it is off. No worries, you can handle this too. I’ll leave the work to you, but, basically, you can completely duplicate today’s project with the longer time value (screen-off should last you 24+ hours, right? Or more than 864 seconds.) When creating the profile, add an extra condition,Display->Display StateOffand add the opposite Display State On for the first profile created today.
If flashing a message to the display is not appropriate or enough for you, as it wouldn’t be with the display turned off, consider using different notification tools. For example, I’ve gone ahead and used theNotify LEDaction. Just flash the red light a few times, then turn it off. No point having a lingering notification and flashing lights to kill the battery even faster.
But wait, there’s more. I just wanted to explain one last thing that I’ve done for my project, I wanted more info, so I created another variable that figures out how much longer my battery will last at its current level and rate of discharge. I simply added that into my on-screen popup message. Oh, and don’t forget that you can use tools likePushbullet to receive these warnings remotelyto your PC or other devices.
A couple things to be aware of: because we are utilizing the device up-time for our calculations, the very first battery change after a reboot may provide a false positive warning. You may also see hiccups when you first unplug from charging your device. You can overcome these by adding full Tasker projects to change that BATTCHANGETIME variable when the device is powered on or when removed from charger. I can live with these two minor and predictable false positives, myself.
Finally, all we have done today is identify when your battery is discharging quickly. If you need to figure out what is killing your battery, be sure to jump back to some of our previous posts on the subject.
Track battery killer appsUse ADB to see what’s eating your battery
I hope thisAndroid customizationproject was as much fun for you as it was for me. Perhaps it is a little frivolous to track real-time battery consumption, and maybe just a bit rough on the battery itself, but I certainly learned how to use old functions in new ways on this project. Next week will be more of this concept, we won’t be looking at your battery again, instead, we are planning to put together an automated time card, for you to track your time spent doing, well, whatever it is you do.
I have to admit that I only just thought up this project a week ago, do any of you have similar projects, or advice you’d care to share?
Thank you for being part of our community. Read ourComment Policybefore posting.
