Affiliate links on Android Authority may earn us a commission.Learn more.
How to scan and clean your drive in Windows 10
July 20, 2025
While you should alwayskeep Windows 10 currentwith the latest patches and updates, great PC performance also stems from an organized, clutter-free SSD or hard drive. By scanning, cleaning, and organizing data, Windows 10 takes less time finding what it needs to carry out your requests. We show you how to scan and clean your drive in Windows 10.
We break this guide into three parts. First, scan the drive to detect any errors related to the “table of contents” that lists where data physically resides, correct cross-linked files, and move data from corrupted areas (if possible). After that, Windows 10 provides tools for removing unwanted data buried deep within the operating system. A third tool organizes data in a logical order so Windows 10 isn’t slowed down by hopping between scattered chunks to get tasks done.

Here is our guide on how to scan and clean your drive in Windows 10 based on version 1809 (October 2018 Update):
Error checking
1. Clickthe “folder” iconon the taskbar to openFile Explorer.
InFile Explorer, the default view isThis PClisting all storage drives in the right panel.3.Right-click on the driveyou want to clean.4. SelectPropertieson the pop-up menu.
Click theToolstab.6. UnderError checking, click theCheckbutton.7. Windows 10 may say you don’t need to scan. If you want to scan anyway, click theScan driveoption.
![]()
Error checking via Command Prompt
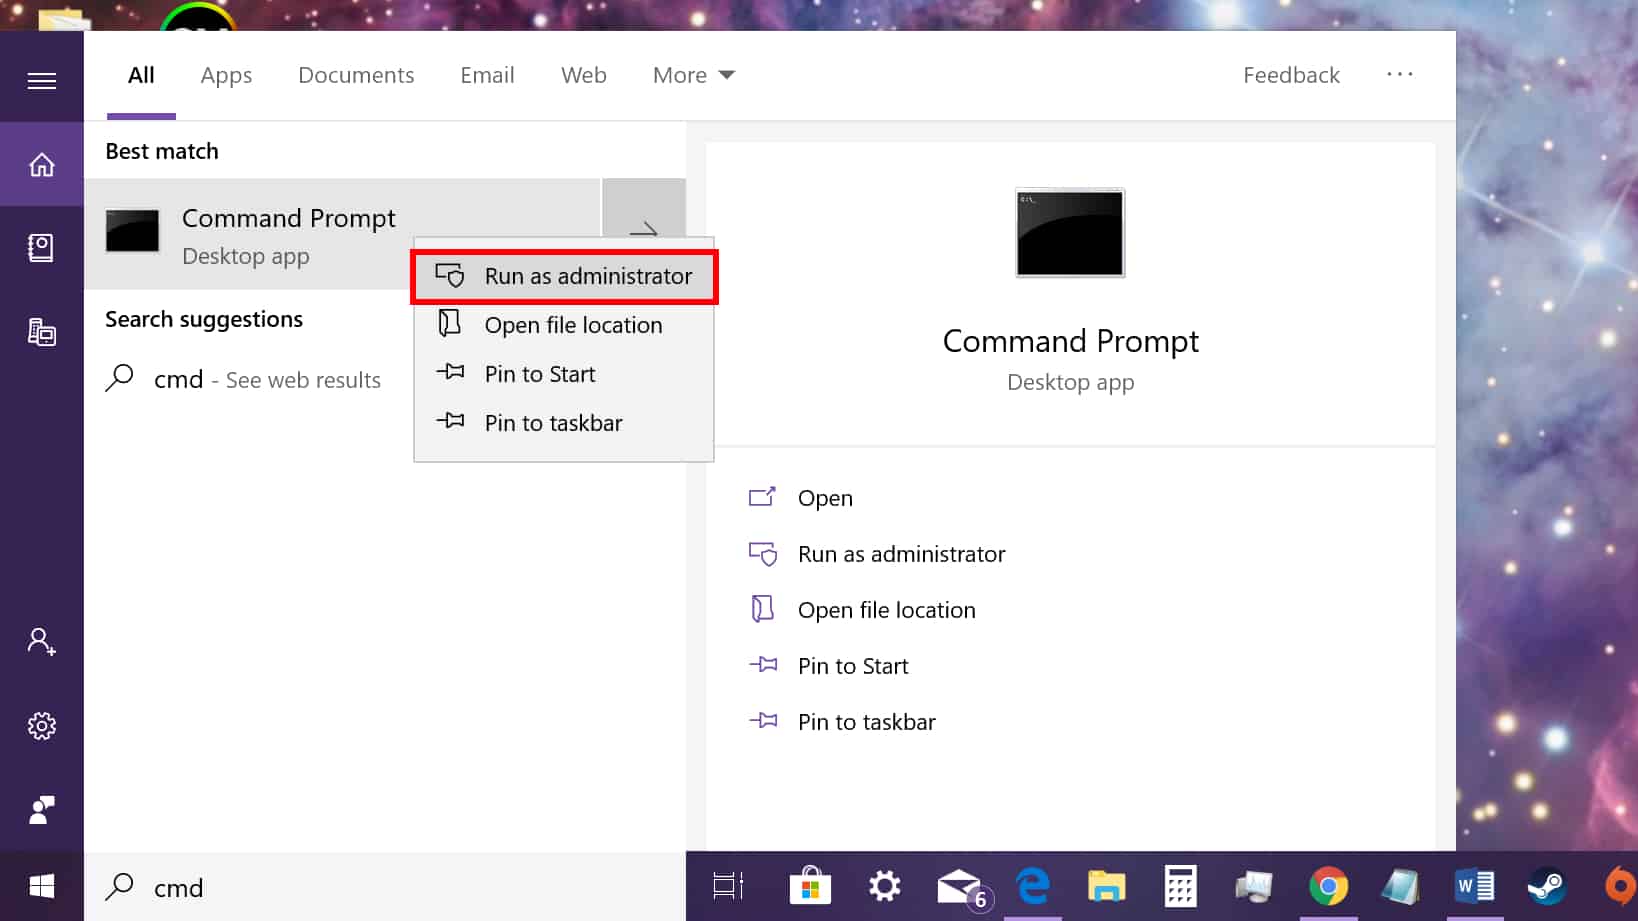
1. TypeCMDin Cortana’s search field on the taskbar.
2.Right-click the Command Promptdesktop app in the results.3. SelectRun as administratorin the new pop-up menu.4. SelectYeson the User Account Control pop-up window.
- In the Command Prompt, typechkdsk C: /fnext to the C:\Windows\system32> entry.6. Since you’re currently using the PC, you’ll need to scan the drive later. ChooseYto schedule a scan the next time your PC restarts.7. Close the Command Prompt.

Disk Cleanup
2. InFile Explorer, the default view isThis PClisting all storage drives in the right panel.3.Right-clickon the driveyou want to clean.4. SelectPropertieson the pop-up menu.
5. ThePropertieswindow loads theGeneral tabby default. ClickDisk Cleanup.
On the list you’ll see an option to compress the OS driveif you’re cleaning the primary C Drive where Windows 10 resides. That means Windows 10 will compress everything stored on that drive – the OS included – into a compact package. Your PC will work as usual, only you’ll have more space as a result. The option on our test PC promises 200GB of additional free space on a 1TB drive after compression.
You’ll also find two options for deleting downloads. They have a similar purpose: Delete everything residing in yourDownloadsfolder. They are new features introduced in Windows 10 1809 (October 2019 Update) and appear to perform the same function. DO NOT CHECK THESE OPTIONS if there are files you want to keep. Instead, manually delete what you don’t want in the Downloads folder.

Here are options you can safely clean:
We suggest you donotclean (deselect):
- After selecting everything you want to clean, clickOK.8. ClickDelete Filesin the pop-up window.
Disk Cleanup: The hardcore version
2. InFile Explorer, the default view isThis PClisting all storage drives in the right panel.3.Right-click on the driveyou want to clean.4. SelectPropertieson the pop-up menu.
We suggest you donotclean (deselect)`:
Defrag your drive
Now that you’ve evicted all the pesky, unwanted files lurking on your PC, arranging everything in order is the next step. Fragmented data stored on your primary and secondary drives bottlenecks performance, as Windows 10 takes more time searching in various physical locations for the data it needs. With data placed in a logical order, Windows 10 spends less time searching for data, speeding up your PC. Windows 10 typically optimizes your drives automatically during inactive hours, but you can manually optimize your drives using the following steps:
2. InFile Explorer, the default view isThis PClisting all storage drives in the right panel.3. Right-click on the drive you want to clean.4. SelectPropertieson the pop-up menu.
ThePropertieswindow loads theGeneral tabby default. Click theToolstab.6. UnderOptimize and defragment drive, click theOptimizebutton.7. In the next window, select the drive you want to optimize.
Click theAnalyzebutton to see if the drive needs optimizing, even if it reads 0% fragmentation. If the drive is good, click theClosebutton.9. If your drive needs optimization, click theOptimizebutton.10. Rinse and repeat for all other local drives.11. ClickClosewhen done.
If you want to change your PC’s scheduled optimization, follow these steps:
2. InFile Explorer, the default view isThis PClisting all storage drives in the right panel.3.Right-click on the driveyou want to optimize.4. SelectPropertieson the pop-up menu.
5. ThePropertieswindow loads theGeneral tabby default. Click theToolstab.6. UnderOptimize and defragment drive, click theOptimizebutton.
7. In the next window, click theChange settingsbutton.
- Make sure theRun on a scheduleoption is ticked.9. Select Daily, Weekly, or Monthly as theFrequency.10. Make sure theIncrease task priorityoption is ticked.11. Click theChoosebutton to select all drives you want optimized automatically.
That’s everything you need to know on how to scan and clean your drive in Windows 10. For more information on how to use Windows 10, click on these guides:
Thank you for being part of our community. Read ourComment Policybefore posting.
